About this deal
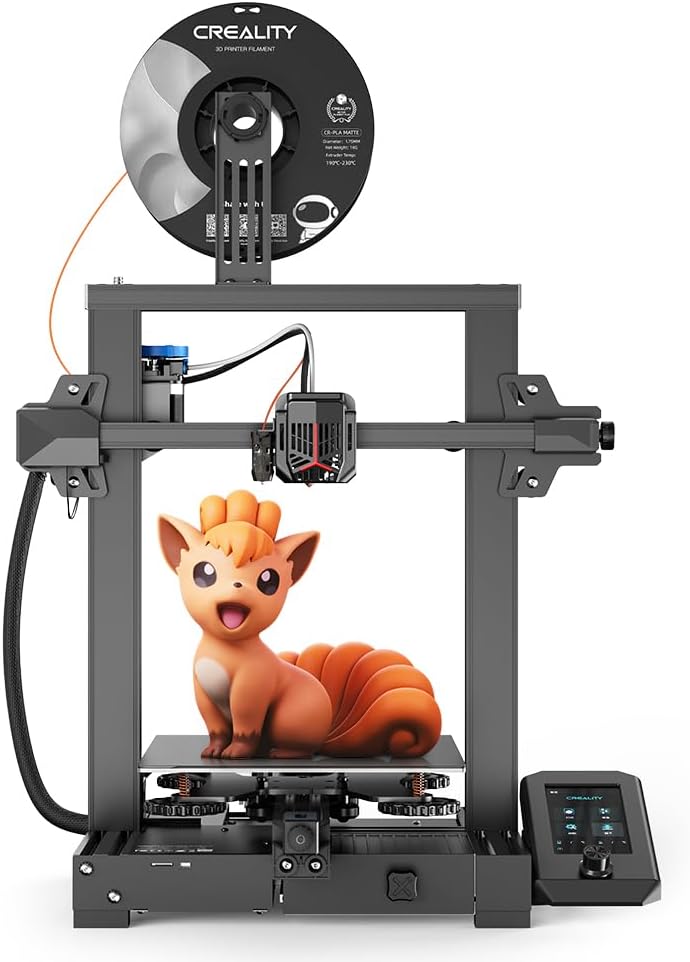
More specifically, we needed to know if there is a noticeable change in the print’s quality as the print speed increases beyond what it’s comfortable with. That said, if your budget is constrained and you don’t mind tinkering with gadgets, then the Ender 3 Neo is a great buy too. It’s definitely not a compromise in terms of print quality or performance. The “Neo” in Creality Ender 3 V2 Neo means “new,” but that doesn’t mean everything about it is new. It inherits many features from its predecessor, the Creality Ender 3 V2. Build Volume So far, we’ve seen how similar the Ender 3 Neo and Ender 3 V2 Neo are in various aspects. But, the Ender 3 V2 Neo is more expensive than the Ender 3 Neo, so what do you get for the added cost? We’ll cover the differences between the Ender 3 Neo and Ender 3 V2 Neo in this section. Bed Material The PC-coated flexible magnetic spring steel build plate on the Ender 3 V2 Neo offers excellent adhesion and a hassle-free usage experience. A little flex of the bed material is all it takes to separate the 3D prints. The smooth bed surface requires little to no cleaning. However, the bed surface is more susceptible to damage than other materials, and it can be difficult to remove prints in some cases.
Put the firmware file "Ender-3 V2 Neo-Marlin2.0.8.3-HW-V4.2.2-SW-V1.1.5.2-CR-Touch-20230312.bin" into the root directory of TF card.The slicer supports several 3D file formats, such as STL, 3MF, AMF, and OBJ files that you can drag and drop into a neat user interface. Material Compatibility
PETG filament is easy to print and is durable and stable. It is a good choice for printing items that are used regularly, such as tools or household items. It is also ideal for outdoor applications. The heating systems are also identical, with nozzle temperatures hitting a maximum of 260°C, while the bed reaches a maximum temperature of 100°C. At this temperature, the hot end can easily handle all of the standard 3D printing materials, including PLA, ABS, and PETG. Mainboard Not only does this eliminate the hassle of manual leveling, but it also produces a cleaner, more accurate first layer, which is vital for the overall quality and bed adhesion of the 3D print. This is also a great feature if you are new to 3D printing, since leveling the bed takes a bit of practice, but even as experienced users we appreciate this feature. Redesigned Hot End There are a few other minor differences between the Ender 3 Neo and Ender 3 V2 Neo, which are not dealmakers or dealbreakers in themselves. Still, they are some nice-to-haves for the more premium model. These include an integrated toolbox and belt tensioners, which add to the improved usability and polish of the Ender 3 V2 Neo. The Ender 3 Neo and Ender 3 V2 Neo share many similarities. In fact, both 3D printers received some of the same upgrades from the previous generation of Ender 3 printers, such as:
Overview
While PC spring steel plate has very good adhesion, it can be hard to remove prints even with the ability to bend the build plate. The carborundum plate on the Ender 3 V2 is a better overall build surface in our experience, since prints are much easier to remove once the bed cools without any need for removing the bed surface. We’ve also found that it’s far easier to damage the PC surface of the steel build plate if the first layer leveling is too low. We’ve analyzed these two varieties of build plates in more detail in our bed material guide. One problem is that the filenames displayed are so truncated that it can be hard to figure them out. It is especially an issue because the names of GCODE files created in Creality's Slicer software already have a substantial prefix, leaving fewer visible characters for the names. Both printers use a Meanwell PSU which is a dependable power supply for fast heating and long hours of 3D printing. We have seen this first hand since none of our printers with these PSUs have needed replacements, while other machines with lower quality power supplies have died on us. Verdict To work the display, you have to rotate the knob, which takes you through the different options. To select an option, you push on the knob, which makes a rather loud popping sound.
So, we printed the halloween mini-pumpkin on the left at 0.1 mm, and the one on the right at 0.2 mm. This is what they looked like. With the settings presented here, you have a perfect starting point to optimize the Cura profile for your Ender 3 V2 Neo. For best results, you might want to use Creality filaments on their printers. A good example is this roll of 1.75 mm PLA that came with our printer.
Therefore, if you want the highest level of definition in your prints, try printing at the minimum layer height. The Ender-3 V2 Neo has a minimum layer height of 0.1 mm with the default being 0.2 mm, same as the original Ender range. All this can be done in 25 minutes, which is not bad for a printer of its capacity. Once we got the parts together, we shifted our attention to the newly added features. Ender-3 V2 Neo New Features PC Spring Steel Magnetic Build Plate An important thing to realize about the Ender-3 V2 is that it comes as a kit. Creality doesn't sell a pre-assembled version. During setup, you bolt together or otherwise connect the parts mentioned above. Building the V2 is more involved than constructing the Original Prusa Mini—for which you bolt the Y-axis assembly to the base, attach the LCD screen and spool holder, and connect some cables, and then you're good to go. Assembling the V2 was akin to the build process for the AnyCubic Vyper, taking several hours for the basic construction and a few more in troubleshooting. The Ender 3 V2 Neo similarly upgrades the Ender 3 V2. By and large, the V2 Neo offers the same functionality and features as the V2, with the biggest improvements being in terms of ease of setup and ease of use. Creality has made an effort to make this 3D printer as beginner-friendly as possible. In fact, it might just be one of the easiest 3D printers to get started with in its price segment. The Ender-3 V2 Neo’s full-metal Bowden extruder offers greater durability, extrusion force, and smooth feeding and retracting of filaments. This is one of the features that pay off in the long run.
The Ender-3 V2 Neo may not have a touch screen display, but there’s something to love about its user interface – the model preview function. It shows you a 3D colored image of what you’re about to print.Depending on which PETG filament you are using, it may be necessary to set the cooling to 100% or reduce it slightly. Pay attention to the stringing behavior and how overhangs are printed to adjust the cooling. Import the Ender 3 V2 Neo Profile from Creality Slicer into Cura Export in Creality Slicer Import in Cura Silent Stepper Drivers - Older 3D printers such as the Creality CR-10 produce a song-like sound when printing due to the frequencies of the motors moving. Newer electronics prevent this issue, making the printer substantially quieter. The only sound you will hear are the fans, which is much easier to ignore. The Ender-3 V2 includes a user manual, which is mostly a setup guide. Text is duplicated in English and Chinese throughout. It starts with front and rear diagrams of the printer, with the parts numbered. Also included are a spec sheet and a comprehensive parts list (erroneously titled "Spare Parts"), with illustrations and names for each part.
 Great Deal