About this deal
Once the grout has cured you can then seal up the gap between the top of eth tray and the tiles. Use a suitable silicone, in this case we used Everbuild Forever White as we find it to be really good. Tighten it so that it is “pinch” tight e.g. tighten it as much as you can by hand and then one final turn to pinch it up and seal it. You don’t need to over tighten it! In this case we used a prying bar to gently lever the front of the tray up by gently working your way around the front edge, loosening it as you go. As the tray was old, the adhesive was beginning to fail so after a little work it came away easily
How to Fit a Shower Tray | All Floor Types and Shapes How to Fit a Shower Tray | All Floor Types and Shapes
Once marked, remove the tray and put it to one side and then cut out the waste hole. In this case we cut a 6 inch hole to allow the waste to sit nicely with a slight gap around it. Note: We always recommend that a shower tray is installed before the walls are tiled as this allows for a much more water tight joint as you can then tile down to the tray and seal it correctly. How to install a low level or low profile shower tray With someone filling the waste for you, use a torch to inspect the waste trap and all the pipework for any signs of leaks. If there are any tighten any compressions joints as required. Once the tile adhesive had cured correctly the battens were removed leaving roughly a 2 inch gap that we could then tile once the ray was fully in place. For further help and advice on ceramic tiling, see our project here.The main rule of thumb when it comes to any job such as this is to keep it as simple as possible. Go with most suitable type of tray for the room space you have and go with the most straightforward method of getting the waste water from eth tray to the main drainage point. Unfortunately in some cases, this may mean a compromise in terms of appearance. If you are simply replacing an old shower tray with a new one it’s best to swap like for like e.g. same size and style with the waste in the same position, however if you want to fit a larger more elaborate tray try to match the waste positions closely. Likewise with a floating timber floor, you can almost guarantee that there will be a supporting wall or other obstacle right where your new waste needs to go!
Wirquin SLIM+ Extra Flat Shower Waste 90mm - Chrome Plated
Once the silicone has cured you can then fix in place the remaining tiles. Don’t be tempted to tile right down to the tray, leave a 2-3mm gap. Allow the tile adhesive to cure for at least 24 hours to ensure its gone off properly. As we have mentioned installing a new shower tray with the waste in the same position as the old one should minimize potentially a great deal of work. New ceramic tiles above a shower tray grouted and once cured gap between shower tray and tiles filled with silicone sealant With the tiles removed the wall was also inspected closely. Again, long term moisture ingress had caused considerable damage so we also pulled a section of wall away and replaced it.
To tidy things up, attach your shower tray side panelsto the tray to create a flush look. These should be really easy to attach, just pay attention to any instructions you get with the product. Step 6 - Seal It! With the tray removed it was also obvious that the floor was badly damaged, so this was also cut away and then damaged joists were also removed and replaced.
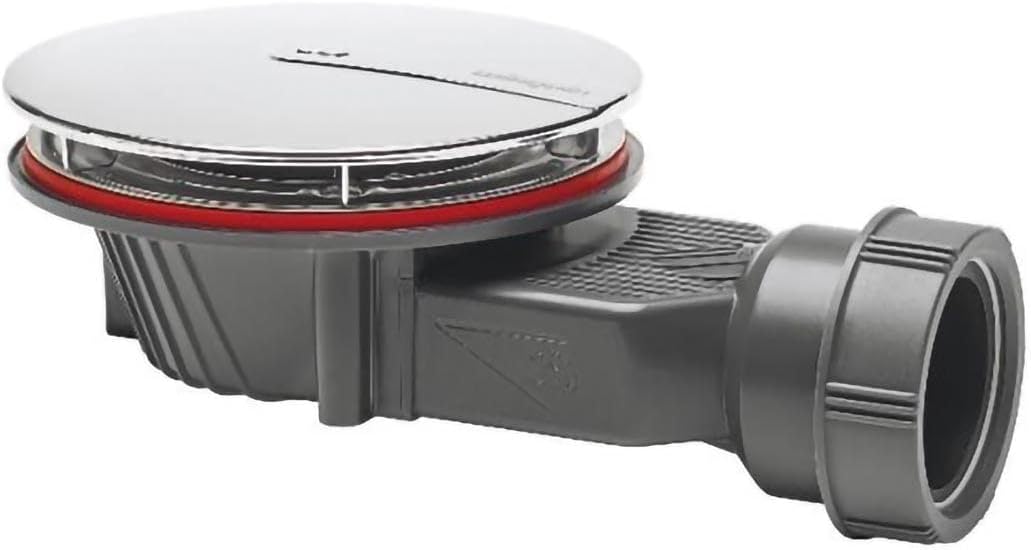
Low Profile Shower Trays - Plumbworld Low Profile Shower Trays - Plumbworld
As I’m sure you can imagine, digging up a solid concrete floor to trace an existing shower waste pipe to a main drain, moving that pipe to a new position or running a new pipe and then covering it over is a fair amount of work.Once the tray has set and is fully secured, the waste can now be connected up. In this case we were using the existing waste so we pushed the end of the waste pipe up under the floor (with the screw cap, washer and tapered rubber seal in place) and using a torch, located it within the connection on the tray’s waste trap. Installing or fitting a shower tray is very much dependent on the type of tray you are installing and the surface it’s being installed on. If you are installing your shower tray over a solid concrete floor then you may be best going with a raised shower tray as this will avoid having to chop down in to the concrete to allow space for the waste.
Shower by Di Vapor - Cascade One Person 90cm x 90cm Steam Shower by Di Vapor - Cascade One Person
In general, if you are installing on to a floating timber floor, a flat low profile tray is the way to go as the flat base will provide great support for the tray and also access to the underside of the tray for the waste should be fairly straight forward as you can simply cut a hole in the floor.Before you start, you need to make sure that the floor beneath the tray is capable of supporting it. It needs to be completely firm, with no flexibility as this can cause problems. Mark out where the tray is going to go and replace any floorboardsin this area with marine plywood that is at least 18mm. Step 2 - Cut Access Hatch Fitting or installing shower trays can be a DIY job but the utmost care must be taken to ensure that the tray is both fully sealed, waterproof and also totally level on the base it’s sitting on once it’s in place. The final task once the internal sealing is done is to then seal the gap at the front between the shower tray and the floor. Due to the damp damage to the walls we had to remove quite a few tiles, not only as they were loose, but also to replace the damaged sections of wall.
 Great Deal